Leakdown Testing the Deep Water Fording System

Once the Deep Water Fording (DWF) system has been installed, it is important to test the system for leaks.

Instructions for testing may be found in the “Instructions for Installation of Deep Water Fording Kit” at Section 3-14. The testing consists essentially of:

  • Block off engine air intake and exhaust, set selector valve to “vent.” (Note, we are unsure as to why blocking off engine air intake and exhaust is necessary — the only connection the DWF vent system has connected to the engine during this test is the vent at the fuel pump). It is imperative, however, to set the selector valve to “vent.”
  • Disconnect the “42 inch long” hose (CDR valve to selector valve) at the CDR valve.
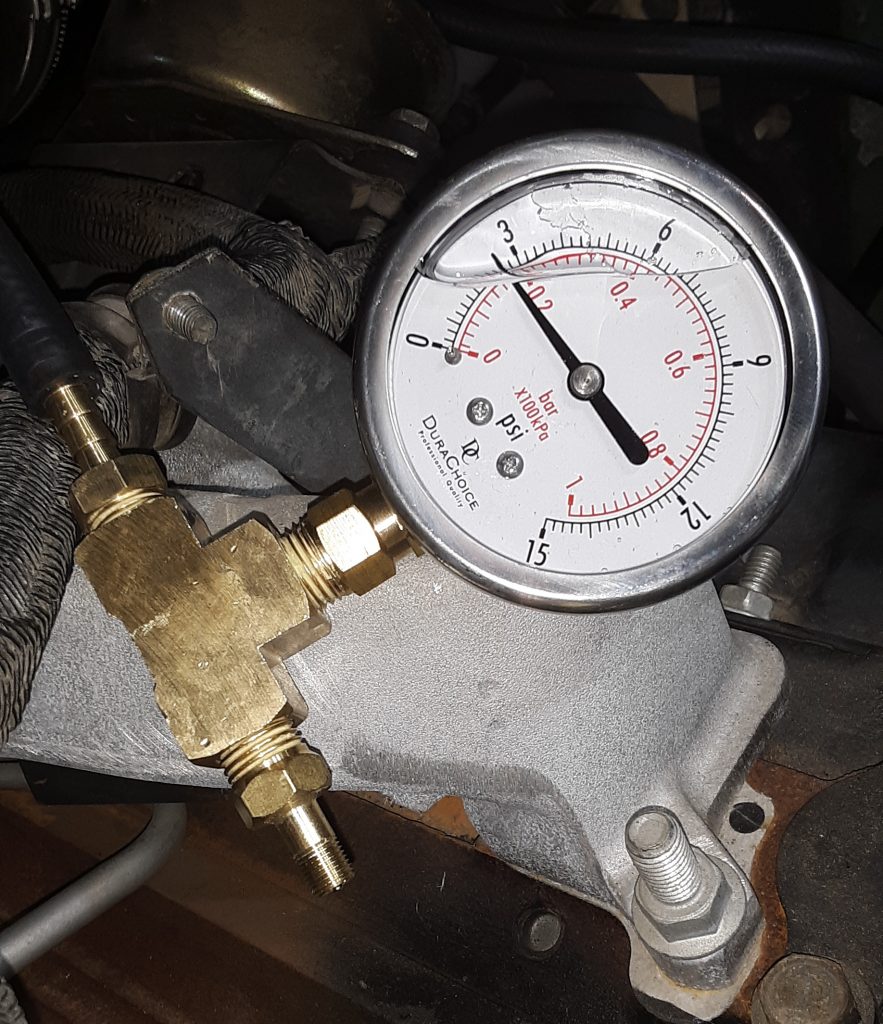
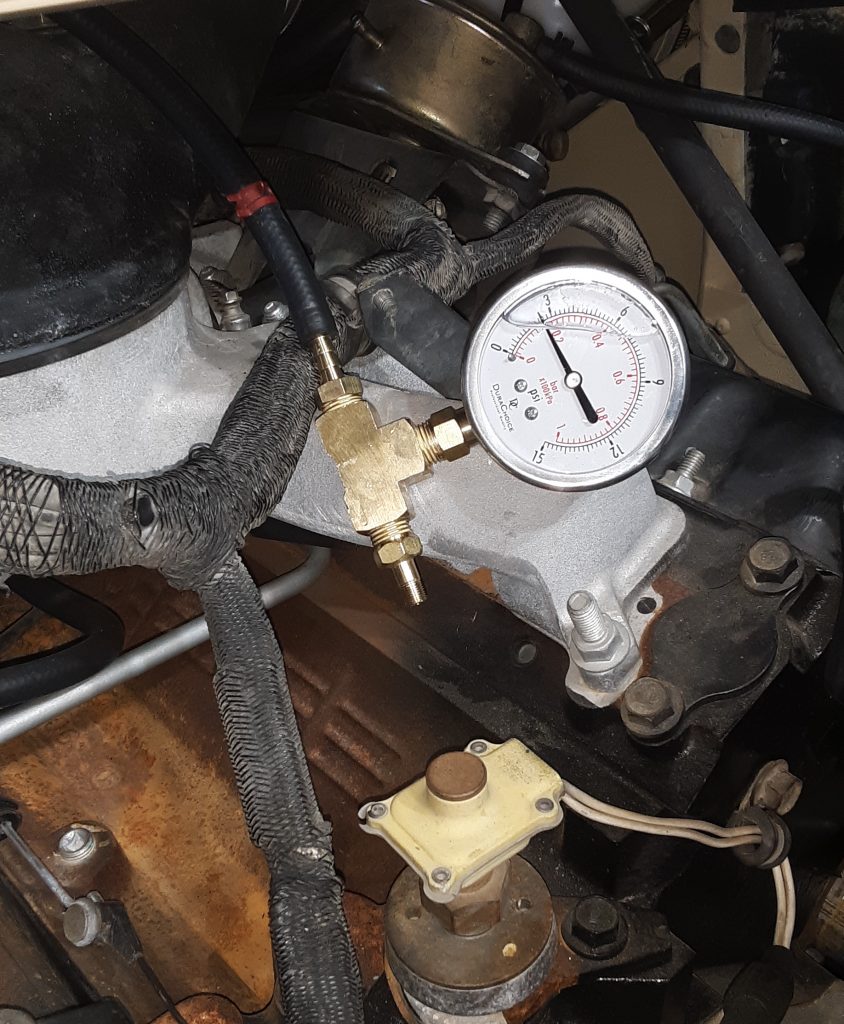
  • Apply 2.5 to 3.5 p.s.i. into the hose removed from the CDR valve. (Note: there are notes to these instructions found on the internet that have redacted “to selector valve hose” so that it reads apply pressure to the CDR valve. This is incorrect, and doing so would be an attempt to pressurize only the crankcase. Air needs to be applied into the hose leading to the selector valve.)
  • The system must have at least 1 p.s.i. in the system after 1 minute.
  • This will check the entire DWF system.

Notes on this test: 1) If there is only a slight leak, testing at 3.5 p.s.i. might pass the 1 minute test, whereas testing at 2.5 p.s.i. would fail the test. 2) It is best to conduct the test in a quiet area so that any leaks can be heard. 3) We recommend use of hand pump only, not a compressor or regulated air source. 4) We suggest making a low pressure leakdown tester as described here. 5) Application of excessive air pressure will likely “blow out,” dislodge or otherwise damage seals in the transmission, transfer case, differentials and gear hubs. Use of other than a hand pump could potentially cause damage in the thousands of dollars to repair.

Our initial testing went well. The tube to the power steering pump had to be removed and blocked because the cap did not seal well enough. After identifying this as a leak point, air was re-applied and was heard leaking into the engine.

As the only point for air to enter the engine would be the vent on the fuel pump, we suspect the fuel pump has a leak into the crankcase. We will first remove the vent line from the fuel pump and test again. If we are able to maintain pressure with that line plugged, we will have to replace the pump.

Our HMMWV failed the 1 minute test, and allows us to diagnose leak points, and potentially catch a fuel into crankcase or fuel into air filter situation.

We will update in a new post as to our further testing. We also want to further examine the venting circuit to ensure that the selector valve should be set to “vent” when testing at the CDR valve.

Special Tools – Fording System Leakdown Tester

In order to confirm that all Deep Water Fording (DWF) vent lines, transmission seals, differential seals, etc are sealed, a leak down test is required.

Pictured above is a leakdown tester we assembled. We used a 1/4″ NPT brass tee, a 1/4″ NPT x 1/4″ hose barb, a 1/4″ NPT x Schrader valve, and a low pressure gauge (0-15 p.s.i.).

You may note that we used a glycerin-filled gauge. A glycerin-filled gauge adds a level of dampening in an application where shock-loading frequently occurs. It is unnecessary for this application, however the cost was only slightly higher than a non-filled gauge. Of note, filled gauges often have a small brass plug mounted in rubber to allow you to zero the gauge out if atmospheric pressure has raised it from zero.

WARNING AND CAUTION: We highly recommend using a hand pump, such as a bicycle tire pump. Should you put excessive pressure into the system while testing, it is highly likely that you will “blow out” seals, and potentially damage seals in the engine, transmission, gear hubs, and differentials. It takes a very little amount of air to reach 2 to 3 p.s.i., and even use of regulated air may provide a “burp” of air at a pressure sufficient to dislodge or destroy seals.

Wiring: Dash Ground

Use of carbon grease on dash ground

The HMMWV has a reputation for grounding issues. Poor grounding can cause faulty or unreliable gauge readings, and can also cause failure of components including the control box.

We removed and cleaned all connections, and liberally applied carbon grease to all contacts to ensure the best possible connection. After this photo was taken, excess carbon grease was wiped off. This compound is highly conductive, and it is unwise to not clean up after a sloppy application.

MG Chemicals’ Premium Carbon Conductive Grease

Wiring: Circuit Breakers

As the breakers currently mounted in the HMMWV are around 30 years old (and have likely gone through countless fordings), we opted to replace them.

Newly installed 15 amp Klixon circuit breakers

These circuit breakers are “Klixon” style 15 amp breakers. The callout in the Parts Manual for these units are 5925-01-430-2318 [5925014302318]. However, this number seems to be obsolete. We were able to locate identical specification breakers under 5935-00-026-4767 [5935000264767]

These breakers have the same external dimensions and the same amp rating as the replaced breakers. The only difficult issue we had is that two of the connections would not release, and had to be replaced.

Wiring – Preparation for Dash Wiring

Rapco “686” Tan applied to dash and vent areas. Note: Paint is still wet, when dry it is completely flat.

Prior to assembling the gauge cluster, lighting switches, filter minder and other connections, we prepped the existing CARC to accept paint. Special attention was paid to masking the window rubber, as paint can rapidly degrade it. This was painted in Rapco “686” Tan (which corresponds with FS 33446).

By pre-painting the dash and vent areas, it ensures an even color when these areas are masked off for complete vehicle paint.

Renovating Shifter Controls: Reverse Light Switch

Early shifter control for basic and A1 versions

The transmission shifter in our M1038 was frozen, in that the release button could not be depressed to release the shifter. Additionally, the lever 2520-01-189-1064 [2520011891064] (Fig. 99, Item 16) was broken at the connection point. After removing the entire assembly, we noticed that this was an atypical shifter in that it had not only the safety switch 2920-01-249-3492 [2920012493492](Fig. 99, Item 20), but also a reverse light switch (not shown in diagram).

Shifter showing neutral safety switch and reverse light switch. Reverse switch is the right arrow.

It is our current understanding that the reverse light switch was used only on Marine HMMWVs, but that it is also desirable for on-road civilian use in states that require a functioning reverse light. The lead from one of the wires was 467 (whereas the neutral safety is 14). Of note, the hole for the reverse switch appears to exist in all of the housing assemblies (Fig. 99, Item 10). (See diagram). Of further note, the switch appears to be the same as the neutral safety other than there is a bushing installed to allow the smaller switch to be installed in a larger hole

Arrow showing reverse light switch. Note bushing surrounding switch.

From this, it appears that a reverse light switch can be installed in any of the earlier shifters. Once we identify the threaded bushing dimensions, we will post it. It seems relatively difficult to source the reverse light switch as opposed to the neutral safety switch.

Neutral Safety Wire #4, Reverse Light Wire 467

Splash Shield Supplemental Armor -LH Side

When installing splash shield supplemental armor 9515-01-189-9728 [9515011899728] to the left hand splash shield, it is required to eliminate the access cover 5340-01-457-0459 [5340014570459] by removing the three screws 5305-00-115-9934 [5305001159934] (MS51849-55) indicated by the red arrows that attach the access cover to the splash shield.

Failure to remove the access cover when installing the supplemental armor will result in an incorrect fit, and possibly damage to the splash shield. Additionally, the access cover cannot be accessed because it will be blocked by the armor.

Install Supplemental Armor on Splash Shields

A HMMWV radiator, as well as the cooler, are rather expensive. Although the splash shields do offer some protection from rocks and debris thrown from the front wheel, they are probably limited to offering protection against little more than water.

Plastic tends to break down over time and exposure to elements. Although our side shields appeared serviceable, we opted to install supplemental armor to provide additional protection.

The picture below shows the RH side supplemental armor 2510-01-189-9744 [2510011899744] installed over the side shield.

There are two additional side shields available for each side. The standard (or basic) radiator shield for the RH side is 2510-01-185-7946 [2510011857946]. The supplemental armor is a little over twice as thick, and is called out as “armor plate.” The basic plate appears to be manufactured from mild steel.

Supplemental armor for the LH side is 9515-01-189-9728 [9515011899728], whereas the basic is 2510-01-185-3107 [2510011853107].

We also updated and improved the fasteners attaching the supplemental armor to the splash shields.

In the picture above, we did utilize the 5/16-18 x 1″ self tapping screw 5305-01-253-2993 [5305012532993] called out for attachment to the air lift mount. However, the TM calls out for a 5/16″ washer over a 3/8″ washer. We instead chose to use a 5/16″ lockwasher and a 5/16 x 1 1/8″ fender washer. In our opinion this offers an esthetic improvement as well as ensuring that the load is evenly distributed. We are unsure as to why this was not done instead of stacking two different size washers. Regardless, our substitution is appropriate.

On the other positions that did not call for a self tapping screw, we substituted 5/16-18 x 1″ “Wiz” bolts and nuts (also known as serrated flange) in place of the regular bolts called out for in the TM. Because of the serrated flanges, these act to some degree as a lock washer, and the flanged head helps distribute load on the inner side of the splash shield. Also, again we used 5/16 x 1 1/8″ fender washers in place of the stacked washers called out.

Hose Clamps: Standard v. Liner

There are two primary types of “open” hose clamps. The two pictured above are SAE Size 72, which we determined is the commercial equivalent of clamp 4730-00-359-9487 [4730003599487].

On the right is the standard hose clamp. On the left is what is referred to as a “liner” hose clamp. The Red Arrow points to a shield that protects the hose from extruding through the “rack” portion of the hose clamp. Liner clamps are often called “military clamps,” but in fact, the liner is designed for clamping softer materials such as silicone hoses.

This size clamp is called out to tighten the 90 degree hose used to connect to the fording stack extension 2510-01-198-0333 [2510011980333] and to the air cleaner. (See Figure 398, Item 31).

Of interest, the standard hose clamp in Size 72 worked perfectly for the fording tube application, however the “liner” clamp was too small. In fact, the liner clamp was manufactured by Breeze, a company that is a supplier of hose clamps to the military.