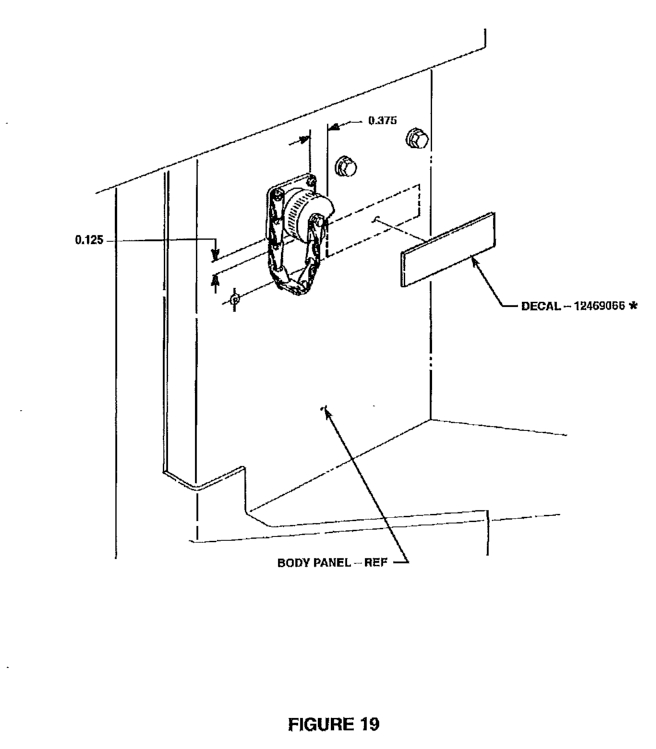
After installation of the 10,000 lb. winch, we went back to ensure all proper warning and instructional decals were applied in their proper places.
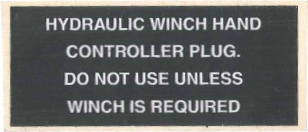
The instruction manual calls out 12469066 [ 7690-01-474-5928 / 7690014745928; Mile Marker 983-0021] being applied near the winch controller connector. Unfortunately, we did not receive that decal in our installation kit. Additionally, we were unable to locate an image of the decal, or even what it warned of.
Ultimately we were able to purchase the decal from Kascar, LLC who had several in stock. We purchased additional decals in the event we need them in the future, or were required to reproduce or make a similar decal for future installs. Below is a scan of that sticker for reference to the text included on it.
12469066 / MM 983-0021 / 7690-01-474-5928 / 7690014745928
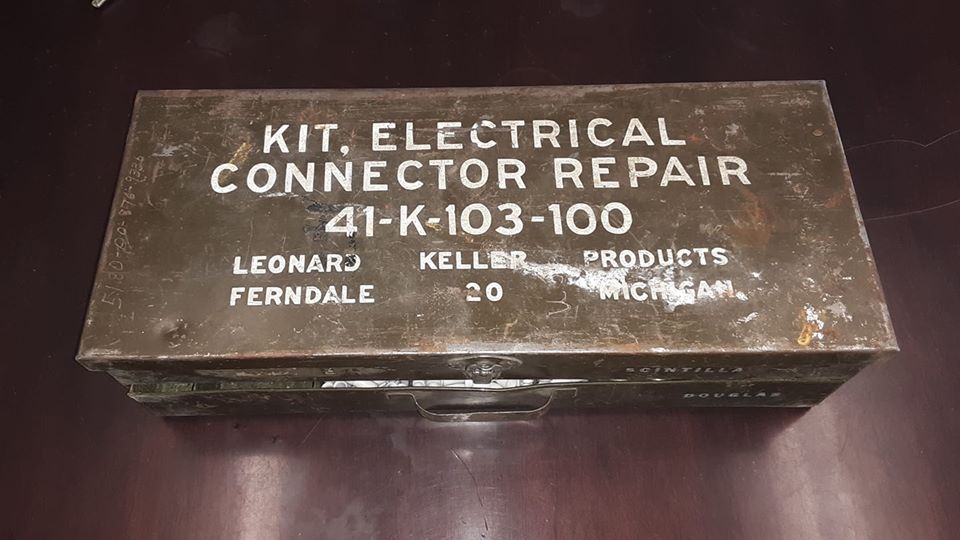
Although we already have the tools, wire, and terminals for repairing HMMWVwiring, it’s nice to have the correct and authentic box. There is a short discussion of this kit at https://olive-drab.com/od_mseries_connectors.php.
We obtained a complete fording intake stack from Alan Post. By complete, we mean the stack extension 2510-01-198-0333 [2510011980333], the clamps 5340-00-079-7837 [5340000797837], the vent tube 4710-01-209-6746 [4710012096746], and the windshield mount bracket 5340-01-238-9543 [5340012389543] with fasteners.
As you may notice, the rubber extends a little higher than normal at the base of the stack. We had ordered several 4 1/2″ silicone 90°s, to see how they would work. As it turns out, the actual AM General part is slightly less than 90°. Use of the silicone 90° required cutting the end that connects to the air cleaner at a slight “off-angle,” as did the portion that connects to the stack. We have instead ordered the correct fitting to replace this, however use of the silicone 90° would definitely be adequate and completely serviceable.
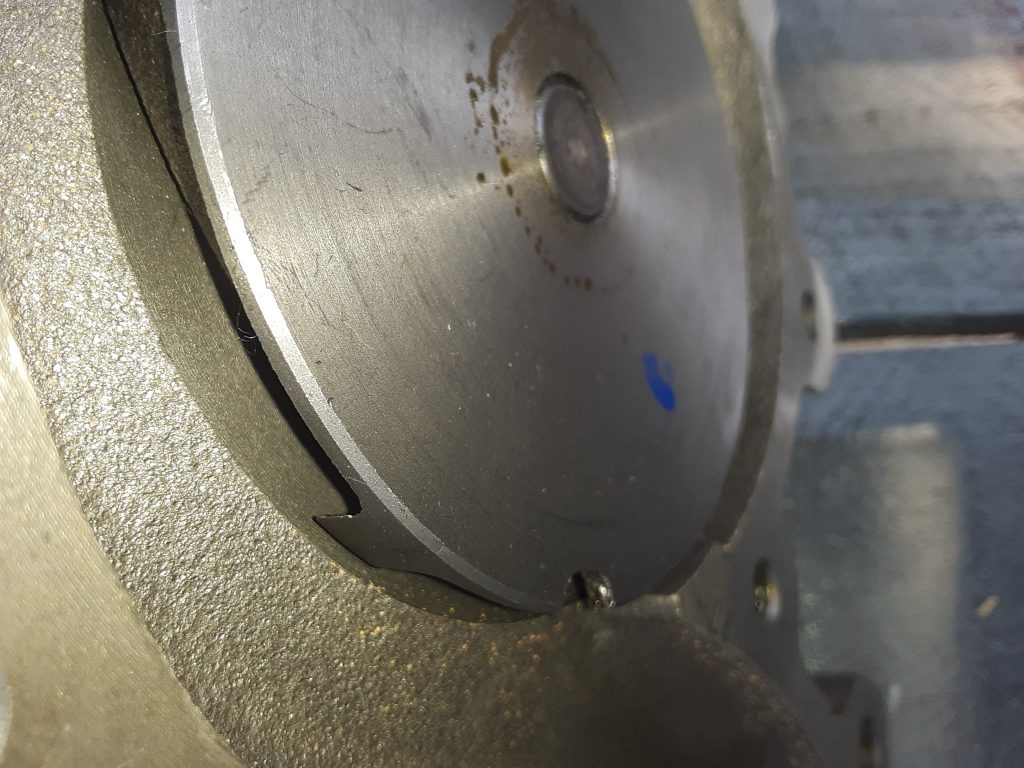
As discussed in an earlier posting, we needed to replace the water pump on our 1038, and chose to use an AC Delco 252-611 as a replacement. Once the water pump arrived, we first inspected the external housing to determine that it was dimensionally the same as the damaged pump, and found that it was virtually identical to 23500085.
Second, as discussed in the earlier posting, we needed to confirm that the rotation of the pump was correct. (V-belt applications use a rotor that rotates in the same direction as the engine, while serpentine belt drives require an impeller designed to work in the opposite direction).
6.5 NA Original Water Pump P/N 23500085 (v-belt application)
Upon visual confirmation, the impeller vanes are the same.
Replacement Water Pump AC Delco 252-611 (v-belt application)
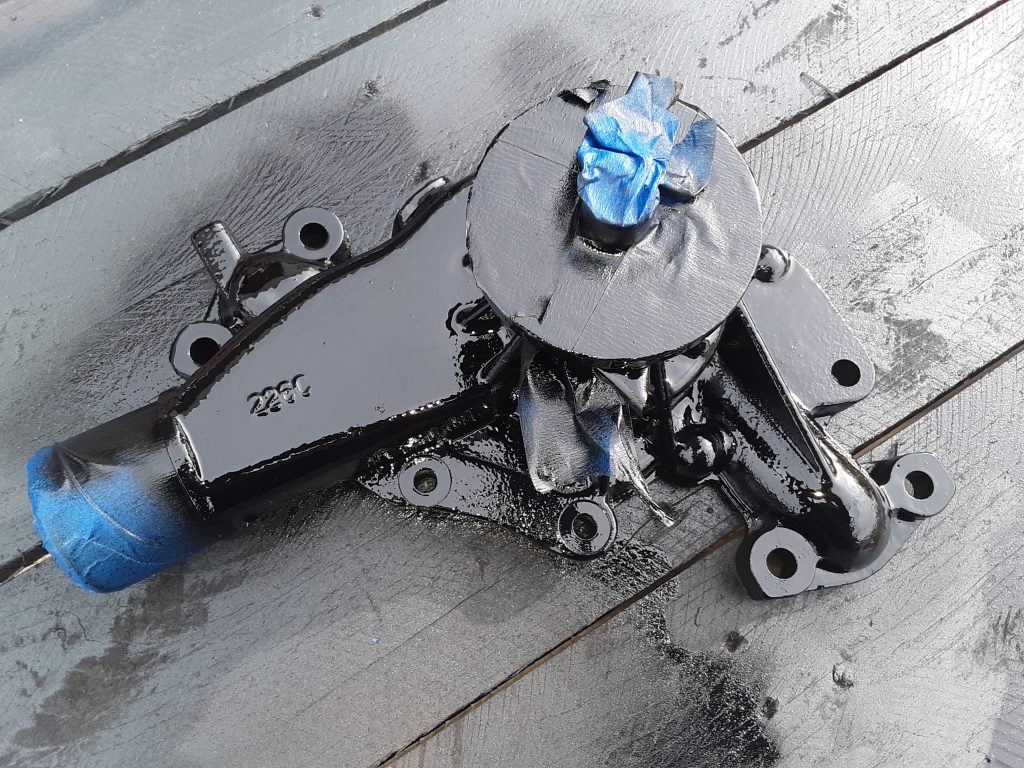
After confirming the AC Delco 252-611 was a proper replacement, we painted the water pump with a glossy engine enamel to match the original pump. In painting a water pump be sure to not paint the face where the pulley mounts, the bearing (as paint can damage the seal), the ports where the fittings go (to ensure proper sealing), and the area where the lower radiator hose mounts to the pump.
Note masking to prevent paint on areas that should not be painted. After removing the masking tape, we were ready to install the pump.
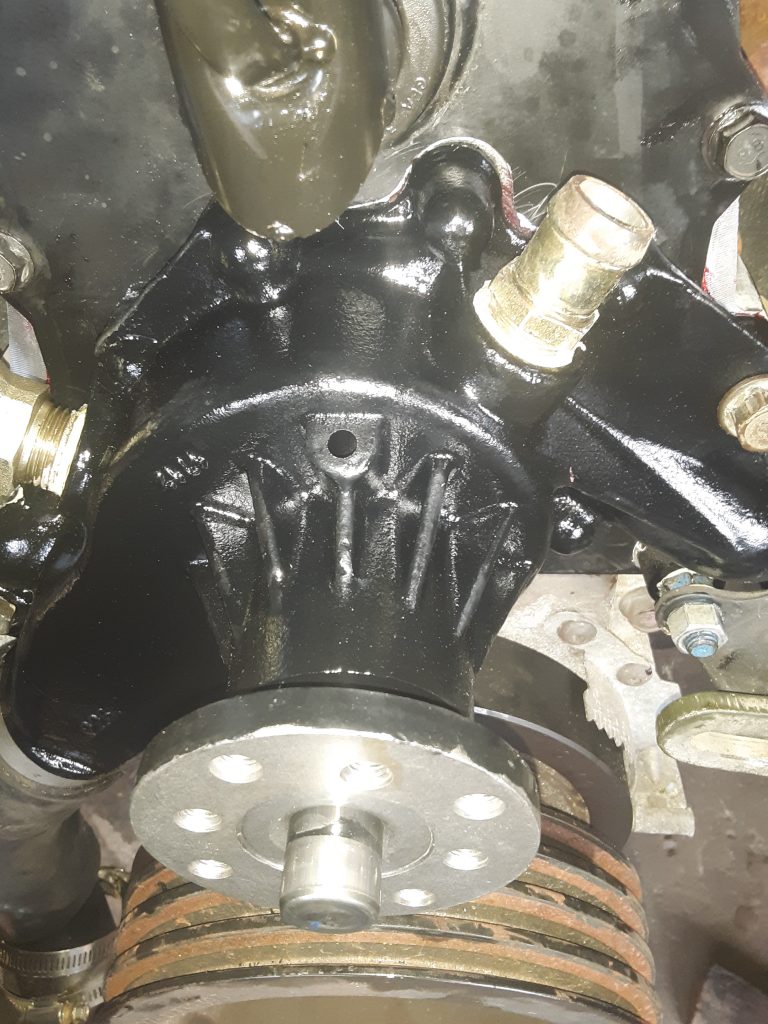
As a note, we installed all bolts holding the timing gear cover and the water pump to the timing gear cover with blue Loctite. As there are seven bolts holding the water pump installed from the inside of the timing gear cover, it is extremely important to use Loctite and torque to specifications. Should one of these bolts loosen or fall out, they fall directly into the timing gears.
Additionally, there are five bolts installed from the outside that are tapped into the water jacket. It is important to re-apply sealant on these threads to ensure engine coolant does not leak on the threads. We used Rectorseal #5, but other products will also suffice.
UPDATE: As we reviewed the drop-shipping invoice, the water pump is billed out as a GM 88926125. This application shows at least for civilian 1990 6.2L, and also corresponds with Airtex AW5008 indicated in a prior post.
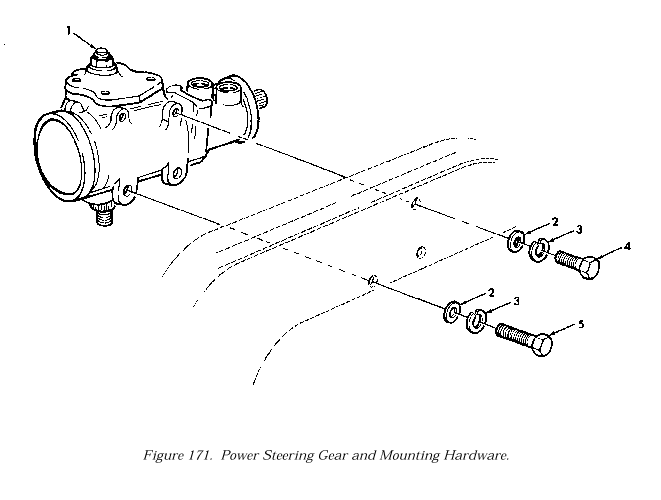
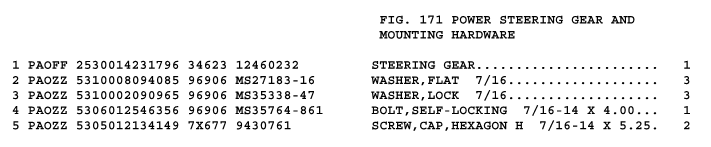
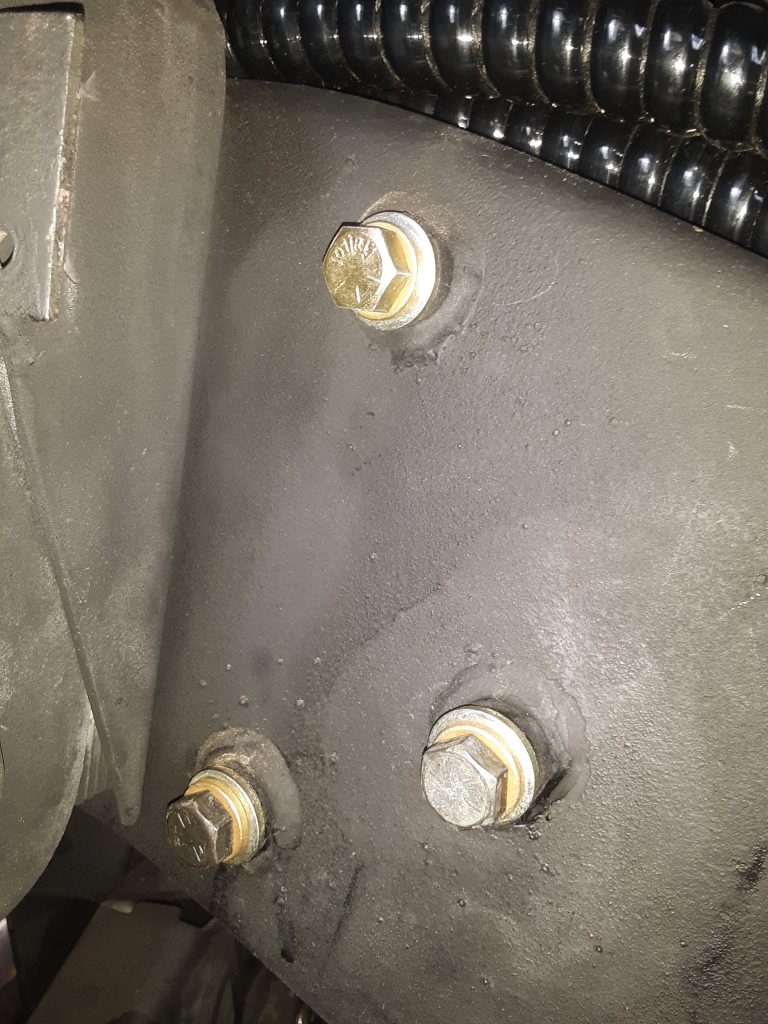
As luck would have it, the steering gear on our project M1038 had only one bolt holding it to the frame. Fig. 171 (of TM 9-2320-280-24P-1), shows two different bolts attaching the steering gear to the frame.
The sole remaining bolt was 5 1/4″ long. According to the call out in the Parts Manual, this corresponded with Item 5, 5305-01-213-4149 [5305012134149]. Unfortunately, however, it was virtually impossible to locate a 5 1/4″ Grade 8 bolt, as the common sizes are 5″ or 5 1/2.”
Although some of the “big 3” indicate that a bolt kit is available for the steering gear fasteners as 5745684, when we ordered it, we were told it was on backorder from AM General, and at least one seller indicated that the kit was simply “discontinued.”
We cancelled the backorder and tried sourcing again. We were able to find a seller on eBay selling “GM Hex Head Cap Screw Bolt 9430761 7/16″-14 x 5.25 Grade-8 UNC.”
As it turns out, 9430761 is the manufacturer’s part number for this bolt, and being as it is a GM steering box, it makes sense that GM would be the supplier. Although we had to purchase five bolts, when we technically only needed one (there was one remaining), we have extra bolts in the event they are needed in the future by us or others.
The callout for the remaining bolt (Item 4) is 5306-01-254-6356 [5306012546356] which is described as: “BOLT, SELF-LOCKING 7/16-14 X 4.00″ Although 4″ is a common length, we were not able to source this specific bolt (MS35764-861) and substituted it with a standard 7/16″-14 x 4” Grade 8 bolt.
It is not uncommon for steering boxes to loosen up over a period of time. We originally opted to use Nord-Lock lock washers in place of the split lock washer. However, in the interest of attempting to keep the project as original in appearance, we instead used Grade 8 split lock washers and heavy 7/16″ Grade 8 SAE washers instead. All three bolts were installed with blue loctite and torqued to 60 ft-lbs.